Measurements Database Tutorial
In this tutorial we want to explore how to store measurements in a database. The InCore Database module provides all database-related objects. We start by storing the measurements in a local SQLite database on the device:
import InCore.Foundation 2.0
import InCore.Database 2.0

Application {
    name: "DatabaseTest"
    LocalDatabase {
        id: exampleDatabase
    }
}
This application creates an empty database in the file /storage/incore/DatabaseTest/exampleDatabase.db. As you can see both the application name and the object ID of the database (either by assigning an ID or setting the Object.objectId property) are crucial since they are used to construct the filename. So never forget to assign an application name and the database object ID and use sensible names.
Next we want to define a database table which can be accomplished easily using DatabaseTable:
import InCore.Foundation 2.0
import InCore.Database 2.0

Application {
    name: "DatabaseTest"
    LocalDatabase {
        id: exampleDatabase
        DatabaseTable {
            id: exampleTable
        }
    }
    onCompleted: {
        exampleTable.open()
    }
}
When running this version a database table called exampleTable is created which you’ll likely want to inspect to verify everything went fine. For this purpose copy the database file /storage/incore/DatabaseTest/exampleDatabase.db to your local computer as described in section Accessing application data in the InCore Development Manual. Now open the file using the SQLite Database Browser and examine the structure of the example table like shown in Fig. 21.

Fig. 21 Empty example table in SQLite Database Browser
So far the table consist of an internal id column only, representing the primary key for this table. The next task is to add columns with actual data to the database table. Any object derived from the DataObject object can be used as a database table column (to be more precise: every DataObjectWriter-based object works with a list of DataObject-based objects). This means we can add a Measurement object and a DateTime object:
import InCore.Foundation 2.0
import InCore.Database 2.0

Application {
    name: "DatabaseTest"
    LocalDatabase {
        id: exampleDatabase
        DatabaseTable {
            id: exampleTable
            DateTime { id: date }
            Measurement { id: foo; data: 123 }
        }
    }
    onCompleted: {
        exampleTable.drop()
        exampleTable.open()
    }
}
Note
Perhaps you have noticed the additional call of the DatabaseTable.drop() method in this version. It’s required in this case since the table already exists after running the previous version but it has a different structure now. Alternatively you can remove the whole database file manually using WinSCP or by issueing rm /storage/incore/DatabaseTest/exampleDatabase.db in a PuTTY session.
Examine the resulting database file again using SQLite Database Browser and observe the additional columns in exampleTable. Now it’s time to actually insert some data rows. Extend the application as following:
import InCore.Foundation 2.0
import InCore.Database 2.0

Application {
    name: "DatabaseTest"
    LocalDatabase {
        id: exampleDatabase
        DatabaseTable {
            id: exampleTable
            DateTime { id: date }
            Measurement { id: foo; data: 123 }
        }
    }
    onCompleted: {
        exampleTable.drop()
        for(let i = 0; i < 10; ++i)
        {
            foo.data++
            exampleTable.submit()
        }
    }
}
The resulting data in the table will look like shown in Fig. 22.
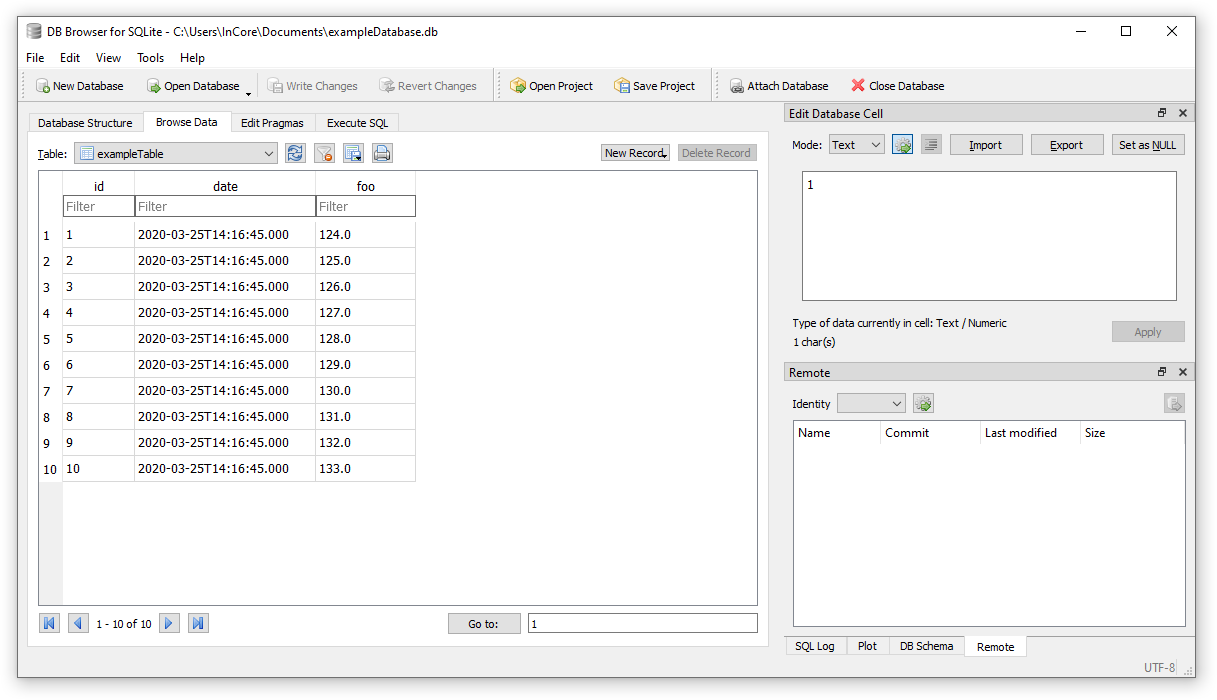
Fig. 22 Example data in SQLite Database Browser
This still is a rather artificial example with way too much non-declarative code. Therefore let’s incorporate what we’ve learned in the Analog & Digital I/O Tutorial and put everything together into a sensible application:
import InCore.Foundation 2.0
import InCore.Database 2.0
import InCore.IO 2.0

Application {
    name: "DatabaseTest"

    AnalogInput {
        id: ain1
        index: AnalogInput.AIN1
        mode: AnalogInput.Mode20mA
        Polling on value { }
    }

    LocalDatabase {
        id: exampleDatabase

        DatabaseTable {
            id: exampleTable

            submitMode: DatabaseTable.SubmitPeriodically
            submitInterval: 2000

            DateTime { id: date }
            Measurement { id: foo; data: ain1.value }

            onErrorOccurred: drop()
        }
    }
}
What has changed compared to the previous example? First we added an analog input which is polled every second. Then two properties related to dataset submissions are customized to make the database table submit a new row every 2 seconds automatically. This way we don’t have to call DatabaseTable.submit() manually using a Timer object. Last but not least the database table is no longer dropped on every application start but in case of an error only, e.g. due to a mismatching table structure.
Congratulations, you just created an application which records real-world data into a database! Now take a look at the DatabaseExporter example and try to make the application above export the recorded data as a CSV file on a USB drive. Sounds complicated but it takes less than 15 additional lines of code, promised!
Tip
Did you know you can exchange the database type easily? Simply change LocalDatabase to MySQLDatabase or MSSQLDatabase and add a few connection-related properties such as Database.name, NetworkDatabase.server, NetworkDatabase.user and NetworkDatabase.password. Afterwards all measurements will be submitted to the specified remote database server.